Leo Prestashop Megamenu Module - Userguide
A great prestashop module to help you create Megamenu for your site.
- Created: 05/05/2013
- latest Update: 09/03/2012
- By: Leotheme
- Email: leotheme@gmail.com
First of all, we would like the thank you for using our work.
Leotheme - a website where you can find the best Joomla! Template, Prestashop theme and Extensions as well. We are proud of our high rated themes, extensions. With years of experience working on Opensource, we have created number of great extensions for both Joomla and Prestashop like: Leo Prestashop Framework, Leo Prestashop Megamenu Module ...
Leotheme is also famous for custom work, if you have trouble or help with your website, coding, .... you can find us on Leotheme.com then we will support you or give you suggestions.
Demo 1
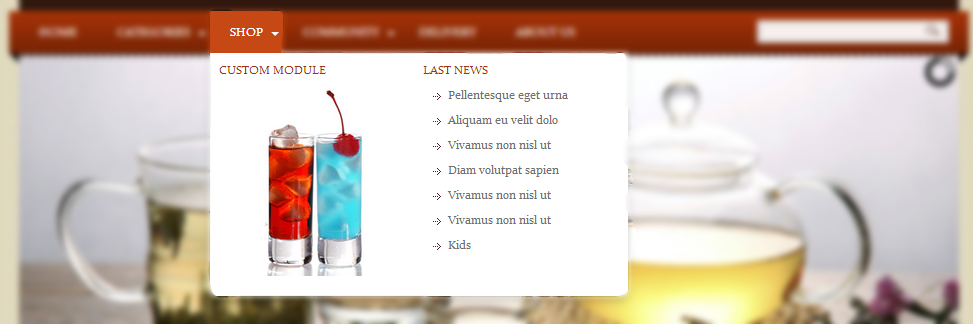
In this demo, the Megamenu has 3 columns. Column one is for Menu items, column 2 and 3 display a module content, just put content you want to display in menu then assign it to a menu.
Demo 2
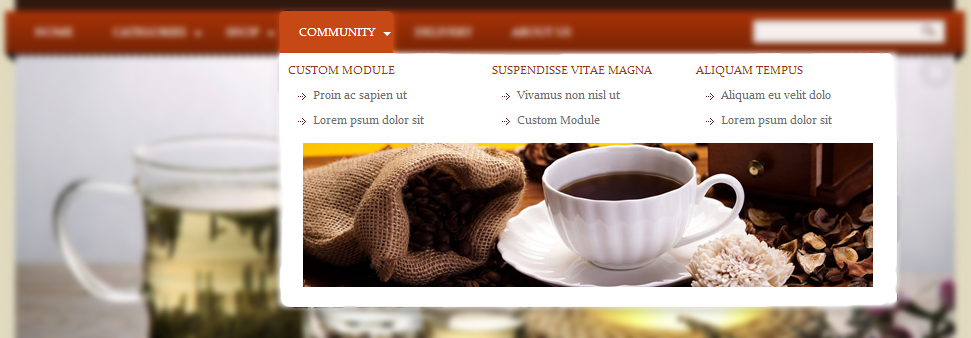
In the Demo 2, the Megamenu also has 3 columns with sub-menus are grouped. Under the memnus is an module content menu.
Demo 3
The demo 3 Megamenu has 2 columns. The first column is a menu that has a module menu assigned and the next column includes menu items that are grouped.
Download and Install
Download
Currently, the module will only be included in the pretashop theme that support the module by default. So you have to download the theme package then the module will be there for you to use.
Install
You can install the module as any other pretashop module. If you are new to prestashop, you can check How To Install Prestashop Module Video Tutorial
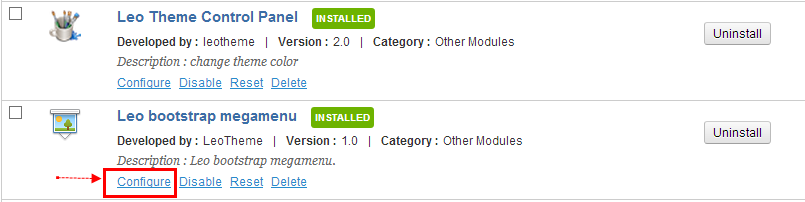
Module Configuration
After install the module successfully, it's time to configure it. From back-end of your site, navigate to: Modules >> Modules. The module will be located under Other Modules tab.
Once you open the config panel of the module, there are 2 main parts in the configuration panel. The left panel includes all menu items in your site, you can drag to move any menu or a group of menu to any position you want. While the right panel allows you to add new menu item or edit an existion menu item, it includes all settings for megamenu of a menu item.

1. Tree Megamenu Management Configuration
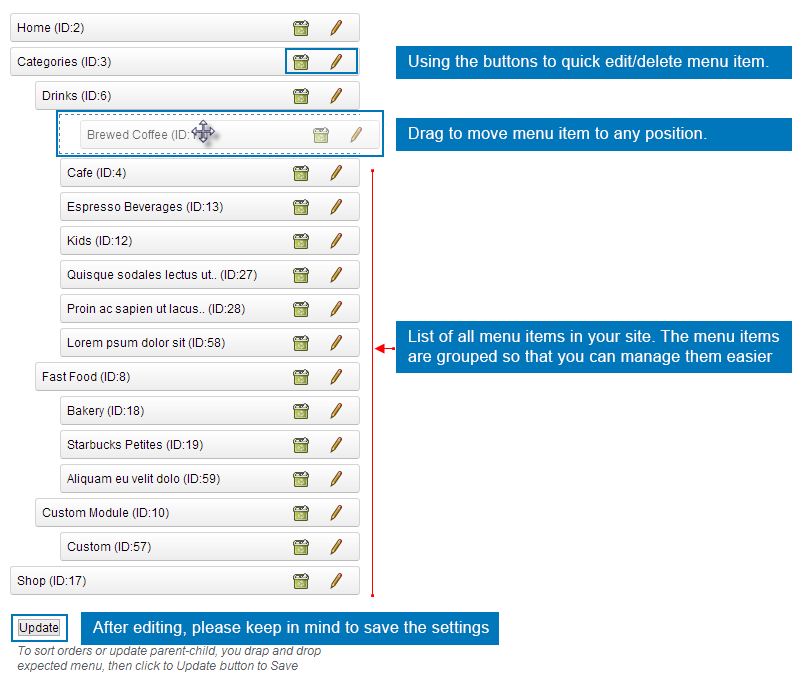
All your menu items will be listed with levels defined. Using the icons beside each menu item to quick delete and edit the menu item. You can drag and drop to change position of a menu item. When you move a menu item that has sub-menu, its sub-menus will also be moved.
Please note that, after changing, you have to update. The "Save and Edit" of the Menu item configuration panel does not update the settings on the Tree Megamenu Management.
2. Configure Megamenu for Menu item
General Settings

- Title: The title of the menu item to be displayed in front-page.
- Description: The description of the menu item that will be displayed as Menu caption, but if you want to display it, you may have to style your menu to fit it.
Menu Type Settings

- Is Published: you can select to display the menu item in front-page or not by publishing it or not.
Menu Link: in other words, it is the menu type. The module supports up to 7 link types: URL, Category, Product, Manufacturer, Supplier, CMS, HTML.
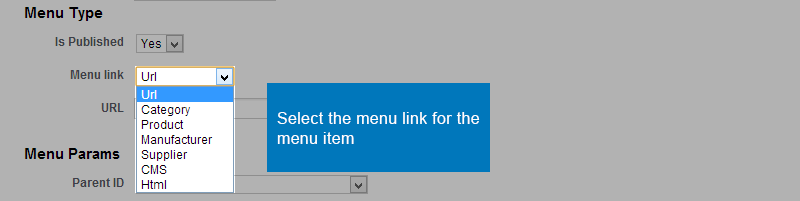
Menu Link = URL

Note: You can input controller of shop, such as: contact, prices-drop, new-products, best-sales, stores, sitemap. My system will auto conver it to YOUR_SITE_URL/index.php?controller=CONTROLLER
Menu Link = Category

Menu Link = Product

Menu Link = Manufacturer

Menu Link = Supplier

Menu Link = CMS

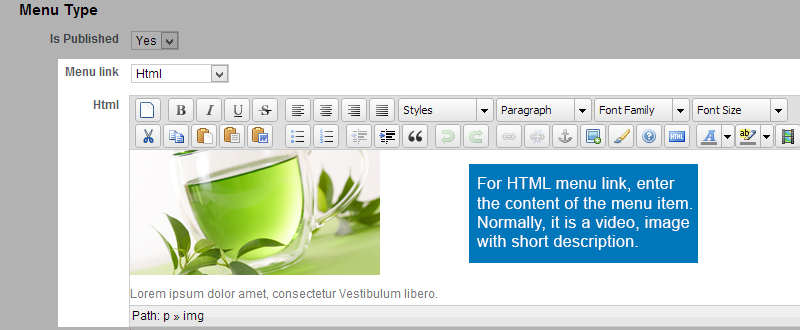
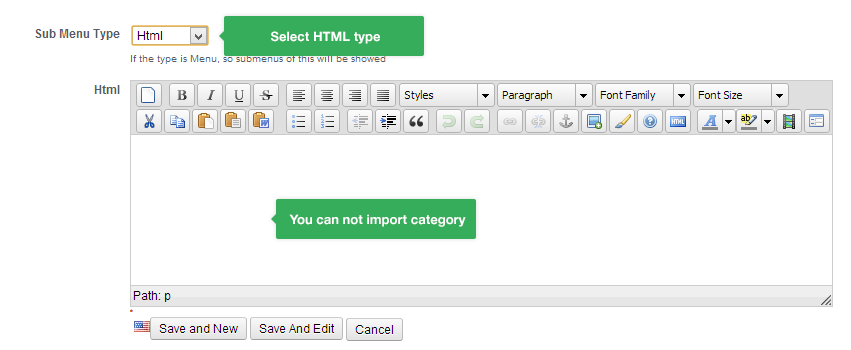
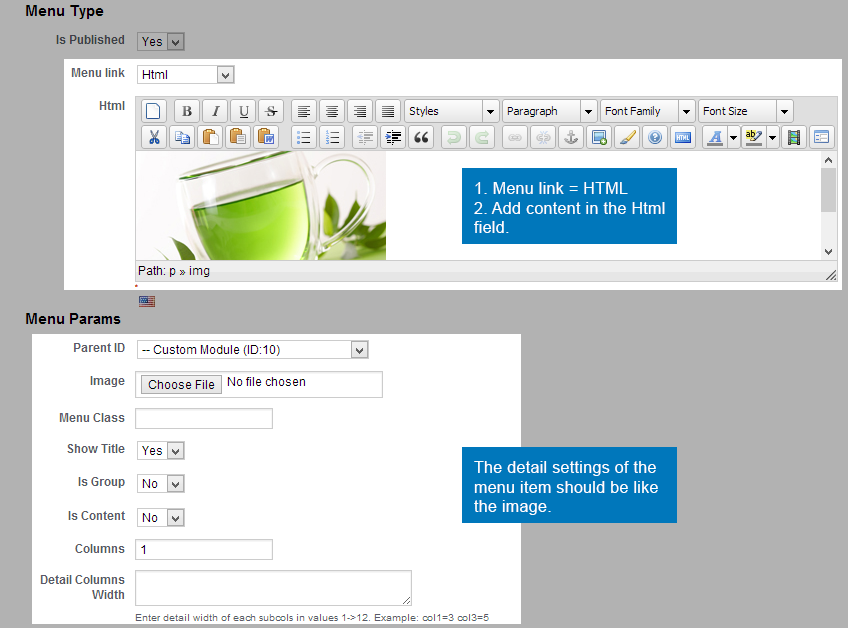
Menu Link = HTML
Menu Params
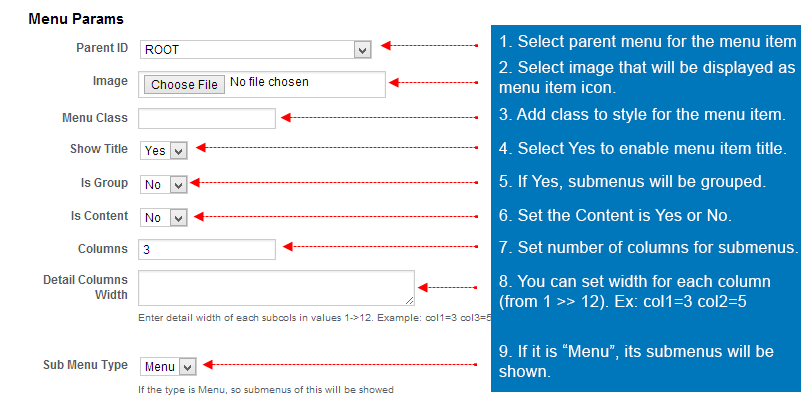
- Parent ID: select parent menu for the current editing menu item. If you select "ROOT" that means the menu item level is 0.
- Image: browse image that is displayed as menu icon.
- Menu Class: you can style for any menu item you want by adding a class that you have created in a CSS file to the field.
- Show Title: you can select to show menu item title on front-page or not. In case it is now shown then only its content will be shown.
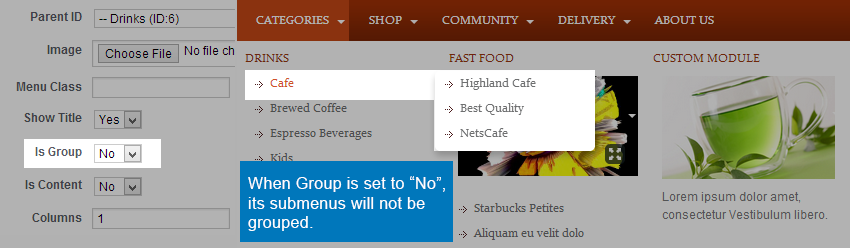
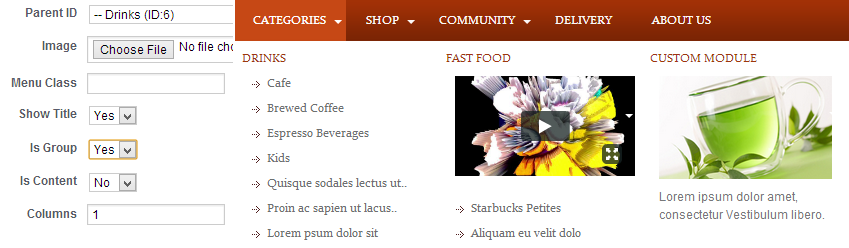
Is group: this option is applied for the menu item's sub-menus. If "Yes" then the sub-menus of the menu item will be grouped.
Group = No
Group = Yes
- Is Content: there are 2 option "Yes" and "No"
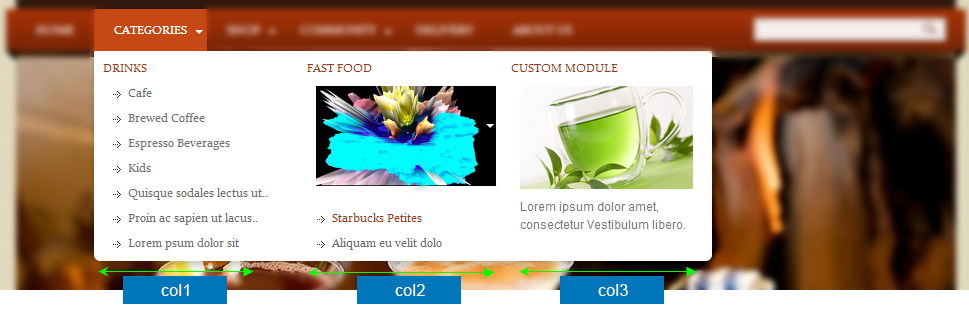
Column setting: set the number of columns to display its sub-menus then you can also set the width size of each column. The base width setting is from 1 >> 12. So the total width of a megemenu is 12, by knowing that you can set width size of each column correctly.
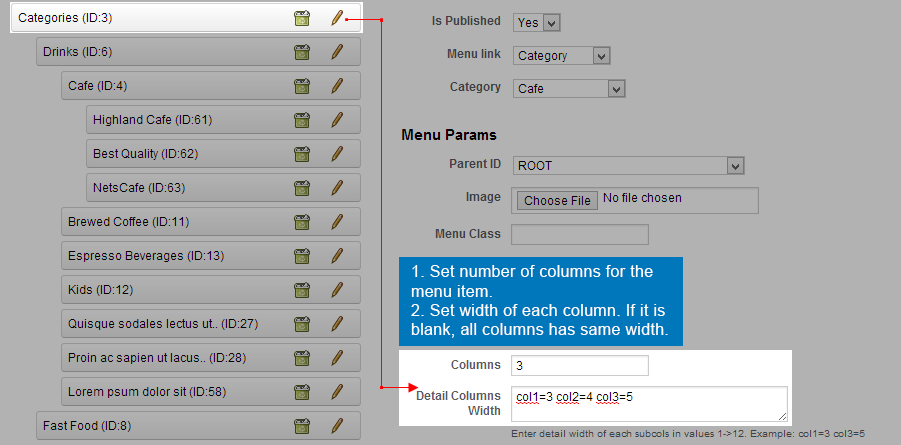
To set width size of column, using: col1=3 col3=5. We have 3 columns, but for column that is not defined here, that mean it uses default width size: 4
Category Submenu Tye
There are 3 options for submenu: Menu, HTML, Category. Category is a new feature, incase you select the submenu type, you can select one or many categories that will be displayed as sub-menu. If you select more than 2 parent categories, you can configure to display those categories in numbers of column.

Note
Incase you select HTML submenu type, you can not import category.
Translate Module
You can translate the module to language you want.
Build Up Megamenu Like Demo
To build up a Megamenu like this, please follow our instructions below:
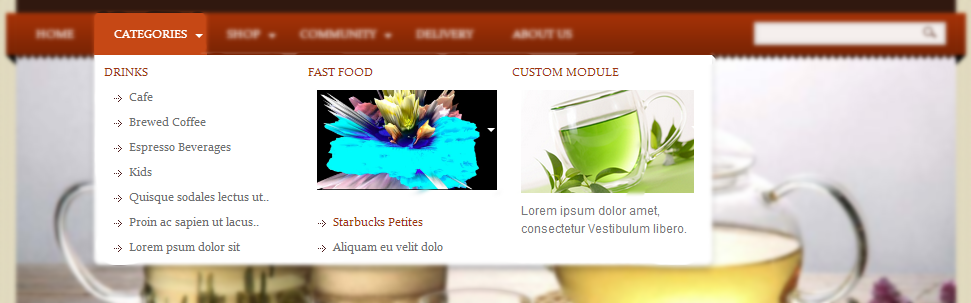
1. Create a menu tree like the following image
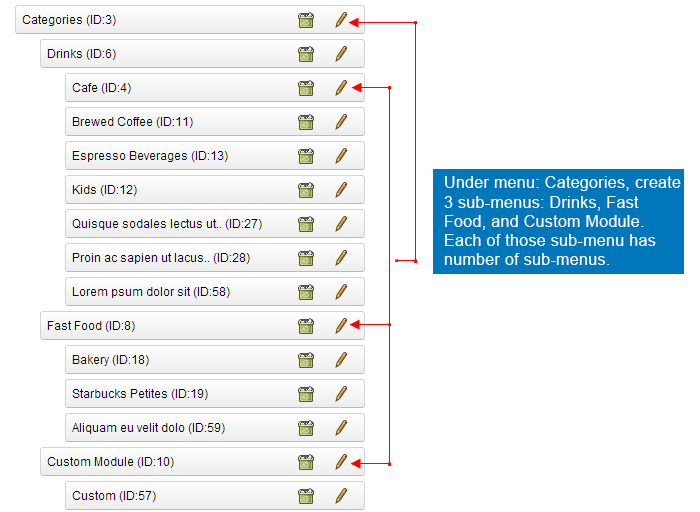
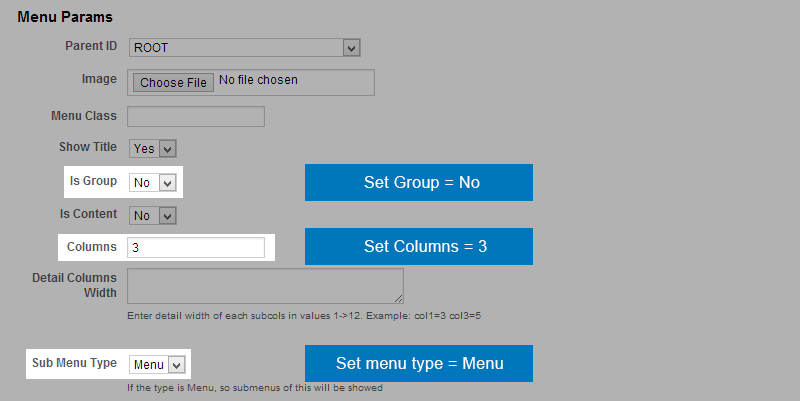
2. Set Column and group option for menu: Categories
Now open the menu: Categories then configure it as the following image
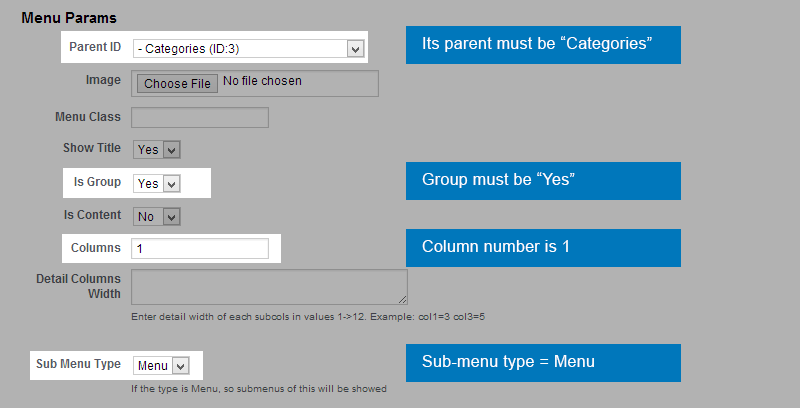
3. Configure Categories's sub-menus: Drink, Fast Food, Custom Module.
The 3 sub-menus has same configuration so we just show settings of one menu within the 3 ones.
Note:
The second and third columns use HTML menu type.
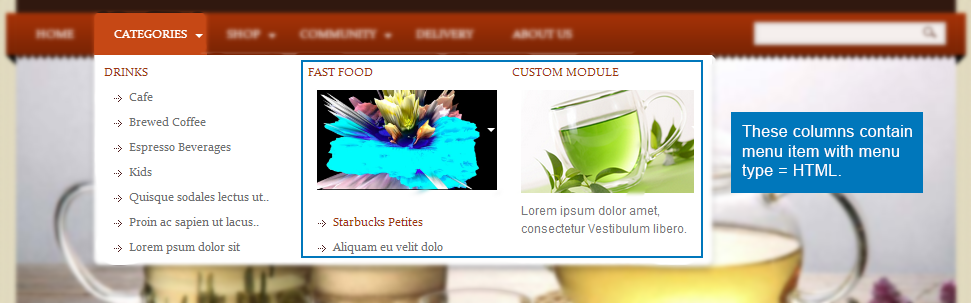
So under the menus: Fast Food and Custom Module, we create a menu item with Menu Type = HTML

Let's check detail setting of one of the 2 menu items.
Cache Setting
This new feature will help you to improve performance of the module. There are 2 steps to enable Cache.
Step 1: Enable Cache in module setting panel.
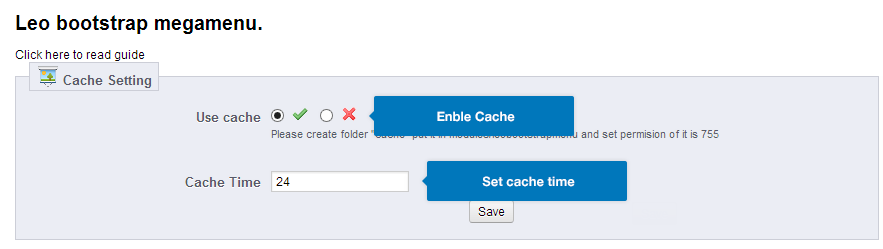
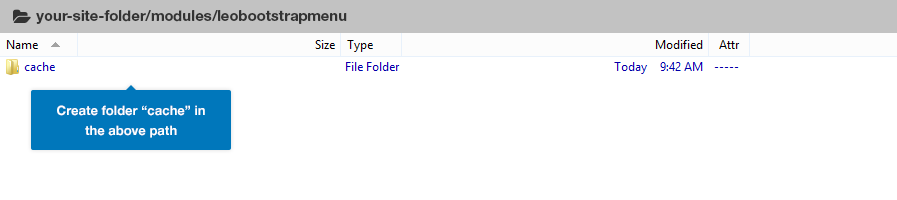
Step 2: create cache folder
Open your site folder, navigate to: modules/leobootstrapmenu/ then create cache folder.
Recommendation
To get support, you can raise your issues in our Forum or send us email through the Contact Form or send directly to the following email: leotheme@gmail.com . We will try to answer and solve problems for you as soon as possible (within 2 days)